
When I was on DJI forums, I found that many DJI Mavic Pro users are reporting that their DJI Mavic pro battery won’t charge and asking for solutions to fix the issue. So I thought to write an article about the issue and solutions to fix the issue with my experience and online research.
Why Mavic Pro Battery Won’t Charge
Most of the time, the DJI Mavic Pro battery won’t charge when the battery has gone into hibernation. Besides that, if your Mavic Pro battery management system is shut down, the battery won’t charge or work as usual.
1. Battery has gone into Hibernation mode
Usually, Mavic Pro Battery Won’t Charge because of this feature. As I mentioned before DJI Engineers have introduced the Intelligent Flight Battery to Mavic Pro for the safety of the battery and long-term usage of the battery. The Hibernation mode is a feature that comes with an intelligent flight battery.
Usually, DJI batteries go into hibernation when the drone is stored for a long period of time. you will know that the battery is in hibernation mode not only when it isn’t charging but also when the battery power LED stays on. You cannot turn the battery power LED off while the battery is in this mode.
3. Battery management system (BMS) shut down.
If your Mavic Pro battery management system is faulty or temporarily shut down, the battery would no longer work or charge until the PF flags are cleared from the battery management system. (We would talk about that).
3. High-temperature or low temperature
DJI batteries including the Mavic Pro have a lot of sensors embedded in them. They care about the safety of the battery and detect the heat of the battery. If it’s not a better environment to charge the battery, the battery refuses to get charged.
4. Inconsistent Firmware
If you haven’t updated the firmware recently or are using some old one, this might be the reason for the issue. To update the firmware of the battery, you should update Mavic Pro’s firmware while the battery is in the drone. Also If you need to update firmware, DJI GO 4 app would pop the “Inconsistent firmware” notification.
When the DJI Mavic Pro won’t charge often?
Many users faced Mavic Pro battery charging issues after these kinds of scenarios.
- After a long period of flight time: As I mentioned before, the intelligent flight battery refuses to get charged when it’s hot. When you have a long period of flight time, the temperature of the battery rises. So when you try to charge the battery it would refuse. Keep the battery in an open environment to cool off.
- Hot or freezing cold weather: A cool or hot environment is not a safe place for lithium polymer battery reactions. So battery sensors detect that the environment is not for charging the battery and refuse to charge. The drone batteries charge well typically between 5°C and 40°C.
- After leaving the drone inside your car. This action also leads to the temperature of the battery.
- Trying to charge the battery after storing them for so a long period. Storing drone batteries for a long time leads them to go into hibernation mode which is actually a safety feature of the battery.
- When it’s time to replace the battery: If you notice visual swelling, leaking, bent terminals, or damage you should stop using the battery immediately because those batteries can harm your drone.
How to fix DJI Mavic Pro Battery Won’t Charge Issue.
Let’s dive straight into the step-by-step process to fix the DJI Mavic Pro battery charging issue. These steps would clear the causes of the issue and ultimately recover the battery from the issue.
Step 1: If the battery is too hot, let it cool.
If you just finished a flight or you left the battery or Mavic Pro aircraft in a closed warm area, the battery might have temporarily shut down. So leave in an open area or airflow to cool to room temperature.
Step 2: Make sure the charger is working.
When talking about this issue, we need to focus on not only the battery but also the charger. If you have a faulty or broken charger, you would have to replace or send it to repair. If you are buying a new one, be sure to buy a quality and certified charger from the DJI.
Step 3: Bring out the battery of hibernation mode.
If you left the Mavic Pro battery depleted or stored for a long term, it would enter hibernation mode to save the battery from damage due to power drain. In this state, you can’t manually turn off the battery power LED. If you can’t turn off your Mavic Pro’s LED after turning it on, your Mavic Pro battery also has gone into hibernation mode.
- Power on the battery and leave the battery unattended for 5 minutes. Then the power LED would turn off.
- Then recharge the battery and bring it out from hibernation mode.
Step 4: Update the battery firmware.
When updating the aircraft firmware, the battery firmware would be updated automatically. For this, the battery needs to be at a sufficient level of charge. If it’s not move to next step.
- Download and install the DJI Assistant 2 application to the PC.
- Open DJI Assistant 2 application.
- Insert the faulty battery into the aircraft and power it on. Then connect the Mavic Pro aircraft to the PC using the USB cable.
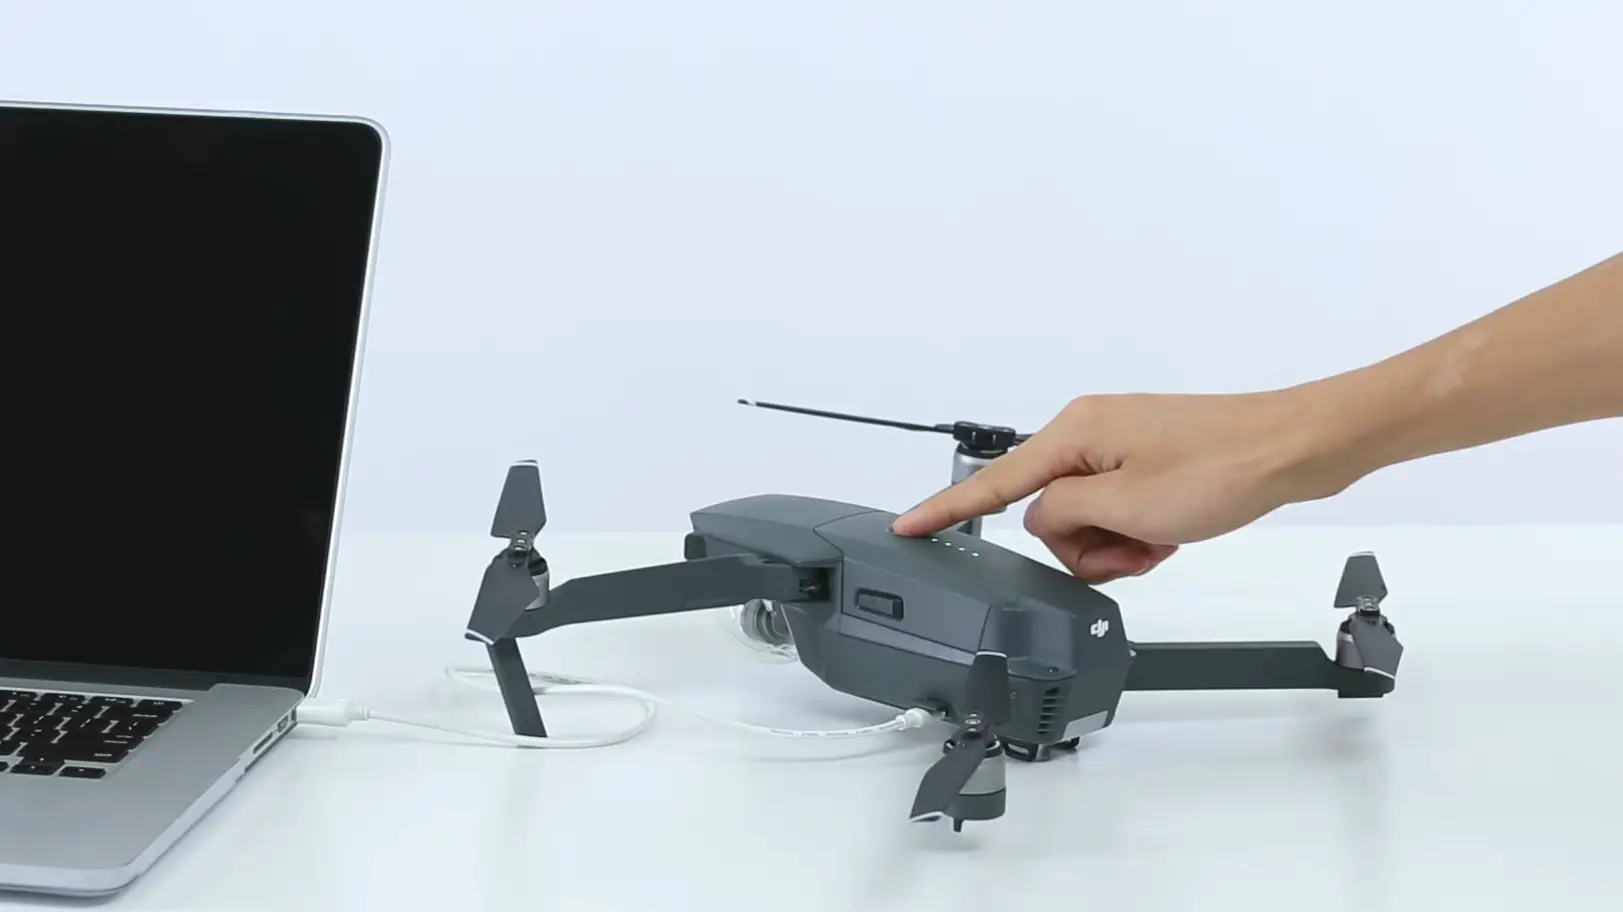
- Then click on the popped Mavic Pro box on the screen.
- Enter your DJI account information that is bound to your Mavic Pro.
- Then enter the “Firmware Update” panel
- Click on the “Upgrade” or “Refresh” button in front of the latest firmware.
- Then click “Start Update”.
- Wait until the firmware is completely downloaded and installed.
- Once the aircraft is updated, unplug from the PC and restart the aircraft.
Step 5: Clear PF flags and recover the DJI battery.
In this step, we are going to clear PF flags that usually cause this issue and recover the battery. Many users were able to recover their Mavic Pro battery by clearing PF flags.
For this step you need,
- BQ Studio software.
- EV2300 EVM interface board (Buy on Aliexpress).
- Uncover the Mavic Pro battery shell.
- And take out the board covering the BMS (battery management system) of the battery.
- Now you would see all the metallic connecting points (SCL, SDA, PRES-M, GND, V1, V2, V3, etc). From these, we need SCL, SDA, and GND)
- When inspecting the EV2300 interface board, you would see ports named SMBD, SMBC, and GND. Now we need to connect them by soldering connection cables connected to those ports to the Mavic Pro’s BMS (battery management system).
Make sure to connect the EV2300 ports with the correct Mavic Pros battery’s BMS port.
- SMBC -> SCL
- SMBD -> SDA
- GND -> GND
- Download and install the BQ Studio.
- Connect the EV2300 to the PC and open the BQ Studio application. If nothing is shown tap the “Refresh” button.
- Go to the “Seal Auth” tab and unseal the battery by selecting the “Unseal” option and pressing the “Go” button.
- Go back to the SBS tab and hit “Refresh”. Now you’ll see the permanent failure flag in IT status.
- Go to the “Pro” tab and type word 0024 at the SMB command 00. Then hit “write”. (Read all about BQ Studio and commands)
- Go back to the SBS tab and hit “Refresh”. But still, the PF flag would stay active.
- Go back to the “Pro” tab and type word 0029 at the SMB command 00. Then hit “write”. (Read all about BQ Studio and commands)
- Go back to the SBS tab and hit “Refresh”. Now you’ll see the PF flag (Permanent failure) has cleared.
- Go to the “Seal Auth” tab and select “Seal”. Then click the “Go” button.
- Now the battery issue is fixed and you just have to unplug connected wires from EV2300 and set up carefully the battery as it was.
- Connect the battery to the charger and charge the battery fully and enjoy it.