
DJI Mavic Air 2 is a huge step up from the DJI Mavic Air and also the design is also different from it. When talking about DJI Air 2s problems, users have faced, there are some quite common DJI Air 2s that users were able to fix.
In this article, we are going to talk about what are the common DJI Mavic Air 2 problems and what are the solutions for them. This article would be definitely useful for DJI Mavic Air 2 users who are struggling with the same common issues.
Common DJI Mavic Air 2 Problems.
Here is the list of common DJI Mavic Air 2 problems. Click on your issue to jump to that part of the article.
- Problem 1: DJI Mavic Air 2 not taking off.
- Problem 2: DJI Mavic Air 2 won’t charge and won’t turn on.
- Problem 3: DJI Mavic Air 2 not connecting to the controller.
- Problem 4: DJI Mavic Air 2 not flying sideways.
- Problem 5: DJI Mavic Air 2 navigation system error (no GPS signal error)
- Problem 6: DJI Mavic Air 2 obstacle avoidance not working.
- Problem 7: DJI Mavic Air 2 battery installation error.
- Problem 8: DJI Mavic Air 2 controller keeps beeping.
Problem 1: DJI Mavic Air 2 not taking off.
Usually, DJI Mavic Air 2 not talking off due to propeller installation issues. If you install propellers to the Mavic Air 2 in an arbitrary way, the aircraft won’t be able to generate the proper upward force to take off. Also installing propellers in an arbitrary way would cause the DJI Mavic Air 2 to flip on takeoff.
Solution: Install Mavic Air 2 propellers correctly.
- There are two types of propellers in the Mavic 2 propeller set. One propeller pair has rings around the hole and the other one doesn’t.
- Install the propellers with marks on the mounting bases with marks. Or install them to the front-right and back-left arms.
- Install other propellers that don’t have marks to mounting bases that have no marks. Or install them to the front-left and back-right arms.
Problem 2: DJI Mavic Air 2 won’t charge and won’t turn on.
In many cases, DJI Mavic Air 2 won’t charge or turn on when the Mavic Air 2 battery has gone into hibernation mode or the battery management system (BMS) has shut down due to power failures.
Solution 1: Wake the battery from hibernation.
If you left or stored the battery for a long term, it might have gone into hibernation mode.
- Plug Mavic Air 2 battery into the charger and leave it for a few hours to wake from hibernation if it has gone into hibernation mode.
Solution 2: Clear PF flags from the battery management system.
For this step you need,
- CP2112 interface adapter.
- Dupont line cables connecting cables (Male-Female).
- DJI Battery Repair software.
- Windows PC.
- Download and install the DJI battery killer software to the PC.
- Take the CP2112 interface adapter and inspect its pins. You would see seven input pins named VCC, GND, SDA, SCL, WAK, INT, and RST. From them, we just need to use three pins which are GND, SDA, and SCL.
- Take three Dupont line cables and connect their female sides to GND, SDA, and SCL.
- Then connect their Male ports to the correct pins of the battery. DJI Mavic Air 2 battery GND, SDA, and SCL pins are shown below.
- Then connect the CP2112 adapter to the PC using a USB cable.
- Open the DJI battery killer software on your PC.
- Then click on “Connect”.
- Then click on “Read Info”.
- Then click on “Unseal” and “Unseal 2”.
- After that click on “Clear PF” and “Clear PF2”. Now the PF flags would be clear and the battery would start blinking and the issue is fixed.
- Click “Exit” and close the application. Unplug the battery and charge it fully and enjoy it.
Problem 3: DJI Mavic Air 2 not connecting to the controller.
Most of the time, DJI Mavic Air 2 won’t connect to the controller when the Mavic Air 2 aircraft is unlined from the remote controller. Other than that, if your Mavic Air 2 aircraft and the remote controller aren’t on the same firmware version, they won’t connect together.
Solution 1: Make sure both aircraft and remote controller are on the same firmware.
- Download and install the DJI Assistant 2 application to the PC.
- Open DJI Assistant 2 application.
- Log in to the DJI account that is bound to your DJI Mavic Air 2.
- Then connect the Mavic Air 2 aircraft to the PC using the USB cable.
- Turn on the aircraft. Then click on the Mavic Air 2 box pop on the DJI Assistant 2 application.
- Then you’ll find all the recent and latest firmware to the DJI Mavic Air 2.
- Click on the “Upgrade” or “Refresh” button in front of the latest firmware. Or if you decide to downgrade the firmware click “Downgrade” on the recent firmware.
- Then click on “Start Update”.
- Wait until the firmware is completely downloaded and installed.
- Once the aircraft is updated, it would restart automatically.
- Next power on the remote controller and connect it to the PC.
- Select “RC for Mavic Air 2”.
- Then click on the update/downgrade/refresh button in front of the firmware that the aircraft updated to.
- Then click “Start Update”.
- Wait until the firmware is completely downloaded and installed.
- Once the remote controller is updated, it would restart automatically.
Solution 2: Link the Mavic Air 2 aircraft to the remote controller.
- Connect the mobile device to the remote controller.
- Power on the DJI Mavic Air 2 aircraft.
- Launch the DJI Fly app and tap “Connect Aircraft”.
- Choose DJI Mavic Air 2.
- Then tap “camera view” at the top right corner.
- Then tap three dots at the top right corner and enter “Control” settings.
- Scroll down and tap “Linking Remote Controller/ Re-Pair to Aircraft”. Then the remote controller would start beeping and the indicator LEDs would blink in sequence.
- Press and hold the aircraft power button for about 4 seconds until the aircraft beeps.
- Then wait for a few seconds. Once the remote controller indicators and aircraft battery indicators stop blinking, the aircraft is linked to the RC successfully.
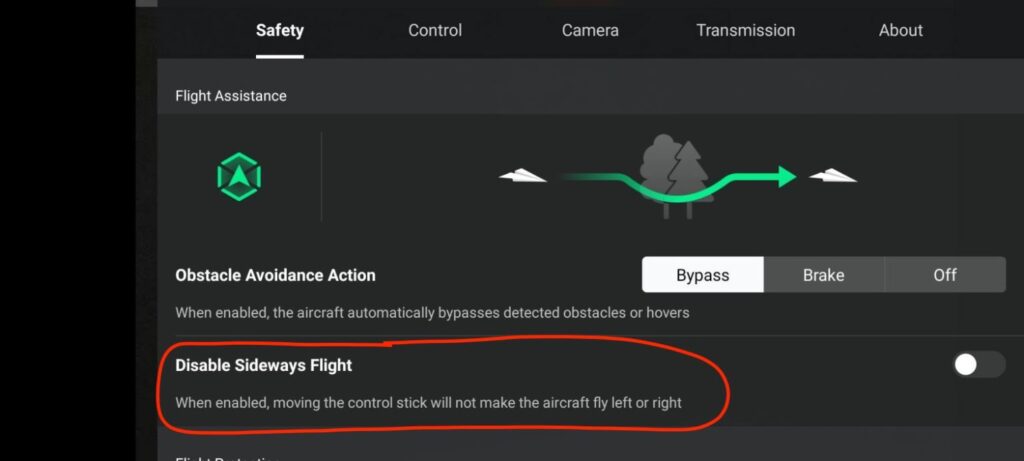
Problem 4: DJI Mavic Air 2 not flying sideways.
Usually, DJI Mavic Air 2 won’t fly sideways when the “Disable sideways flight” option of the DJI Fly app is enabled.
Solution: Disable the “Disable sideways flight” option.
- Open the DJI Fly app and enter the camera view. Then hit on the 3 little dots in the upper right corner of the fly app.
- Then go to the “Safety” tab and check whether the “Disable Sideways Flight” is turned on. If it is turn off it.
Problem 5: DJI Mavic Air 2 navigation system error (no GPS signal error)
Most of the time, DJI Mavic Air 2 navigation system error (no GPS signal error) is caused by faulty GPS modules and temporary glitches. Many users were able to fix this error by replacing the DJI Mavic Air 2 GPS module.
Solution: Replace the GPS module.
Problem 6: DJI Mavic Air 2 obstacle avoidance not working.
In many cases, DJI Mavic Air 2 obstacle avoidance won’t work when the obstacle avoidance Action is turned off.
Solution: Change the Obstacle Avoidance Action.
- Open the DJI Fly app and go to the camera view. Then click on the three dots in the right top corner and click on the “Safety” tab.
- Then check whether the obstacle avoidance is off. If it’s off, select Bypass or brake mode as you prefer to enable the obstacle avoidance feature.
Problem 7: DJI Mavic Air 2 battery installation error.
Most of the time DJI Mavic Air 2 battery installation error is caused by a lack of connection between the battery and the connectors inside the aircraft.
Step 1: Take a brush and clean the metal pin series of the battery.
- Take a dry or little bit wet toothbrush and brush the metal pins series and other metal connectors carefully until they look shiny and clean. Also, don’t forget to brush the side metal connectors of the battery.
Step 2: Slightly pry up the battery’s side metal connectors.
- Use a knife or something hard and thin.
- Then insert it between the side metal connector and slightly pry up it a little bit.
- Do the same to the other side connecter.
Step 3: Use a toothbrush and clean the aircraft’s connectors.
- Take a dry or a little bit wet toothbrush and clean the aircraft’s connector as you cleaned the battery’s connectors. When cleaning contact don’t miss any metal contact because those metal pins or plates would definitely connect with the battery.
Step 4: Once the aircraft’s and battery’s connectors are cleaned insert the battery into the aircraft.
- Right now you have cleaned all the contacts of the battery and aircraft. Also, you have fixed bent-side connectors. Insert the battery into the aircraft and power it on.
Problem 8: DJI Mavic Air 2 controller keeps beeping.
In most cases, DJI Mavic Air 2 remote controller keeps beeping continuously when the remote controller joysticks or gimbal wheel requires calibration.
Solution: Calibrate the remote controller.
- Connect the remote controller to the phone using the USB cable of the remote controller.
- Power on the remote controller.
- Open the DJI Fly app on the phone.
- Turn on the aircraft and connect the DJI Fly app to the Mini 2.
- Tap “Go fly” and enter the camera view.
- Then turn off the Mini 2 aircraft.
- Then tap on the three dots at the top right corner and open the menu.
- Select the “Control” option and scroll down on the list and hit “RC Calibration”.
- Then hit “Start”. Now the controller would stop beeping temporarily.
- First Move the left stick in all directions until those bars fill 100%.
- Then Move the right stick in all directions until those bars fill 100%.
- Then turn the gimbal wheel to both sides.
- Calibration would be successful.